CB Sounddesign
Auto-sampler for Decent Sampler and others
Operator's manual
Sample Harvester
Point it at a hardware synth, tell it which notes you want, and it plays the instrument, records every note, slices the take and writes a finished .dspreset with a panel already built. One page, five sections, worked top to bottom.
Requires
A Chromium browser — Chrome, Edge or Opera. Safari and Firefox have no Web MIDI: the audio list still fills, the MIDI list does not.
Both directions
MIDI out to play the synth, audio in to hear it back. One interface usually gives you both, and Sample Harvester pairs them for you by name.
Work in order
Each section unlocks the next: scan, connect, measure, plan, record, export. Buttons stay grey until the step before them is done — that is the interface telling you what is missing.
Not only Decent Sampler
The export writes a Decent Sampler instrument because that is the one format it can build a playable panel for. Save WAVs only gives you the same take as plain 48 kHz files, named by note, ready to map in Kontakt, SFZ, Ableton Sampler, Logic's Sampler, or anything else that reads a folder of WAVs.
Section one
Sampling a synth in ten steps
- Patch the synth's audio output into your interface and its MIDI input to the interface's MIDI out. Dial in the patch you want sampled, then leave the synth alone.
- Press Scan devices and allow the browser's microphone and MIDI prompts. The line underneath reports how many MIDI outputs and audio inputs were found.
- Choose your Audio in. Sample Harvester guesses the matching MIDI out from the name and tells you it did — change it if the synth is on another port. Set the Channel the synth listens on.
- Press Connect. You get the input's real sample rate, channel count and base latency, and either a confirmation or a warning about the format.
- Press Measure latency. It plays C4 five times and times how long each note takes to come back. Keep the room quiet and leave the synth making sound.
- Fill in the Sampling matrix: instrument name, lowest and highest note, interval, hold time, tail, one or two velocity layers.
- Read the estimate it prints — file count, total duration, size on disk — and adjust before committing. This is where a four-hour take becomes a twenty-minute one.
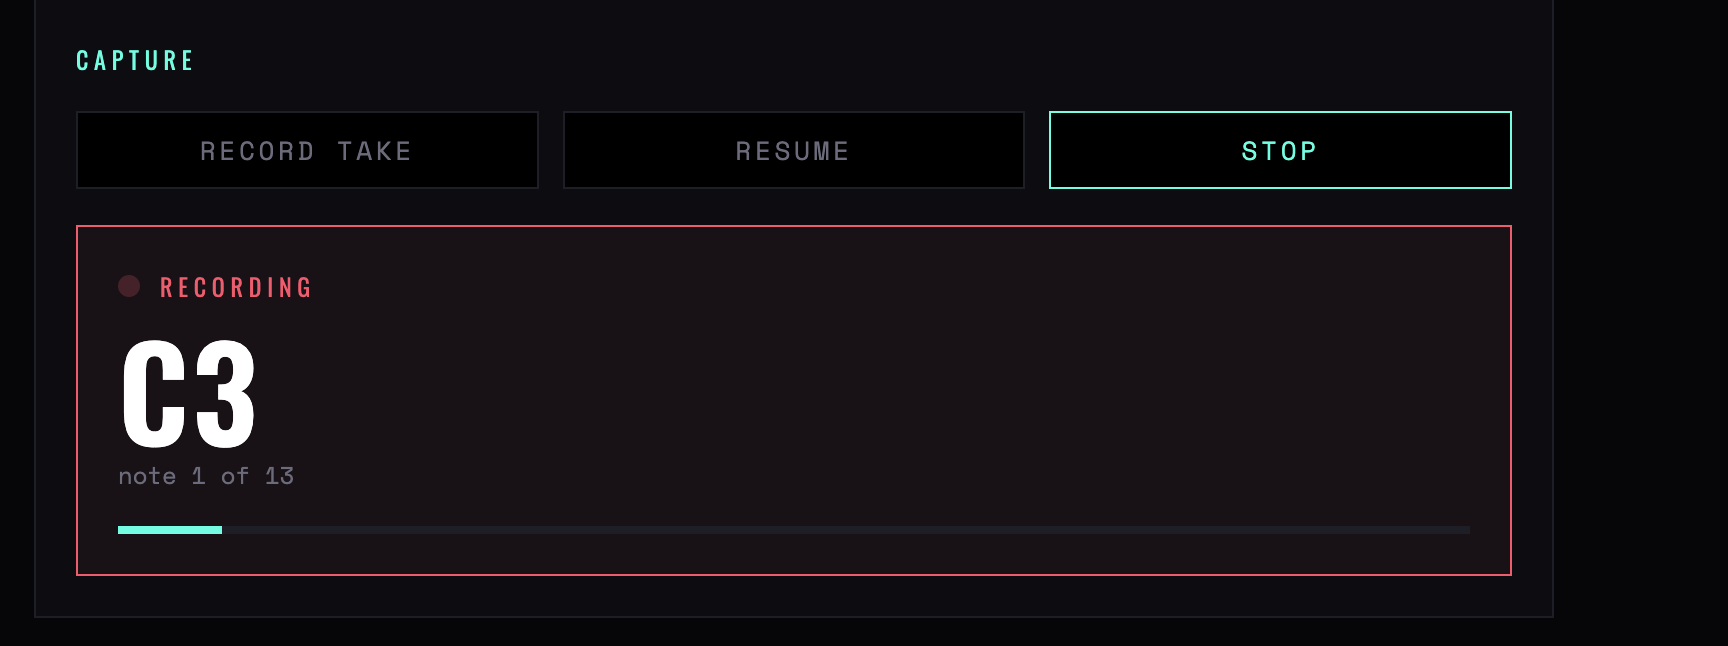
- Press Record take and leave it. The panel shows the note being played and the running count. Stop ends cleanly after the current note; Resume picks up where it stopped.
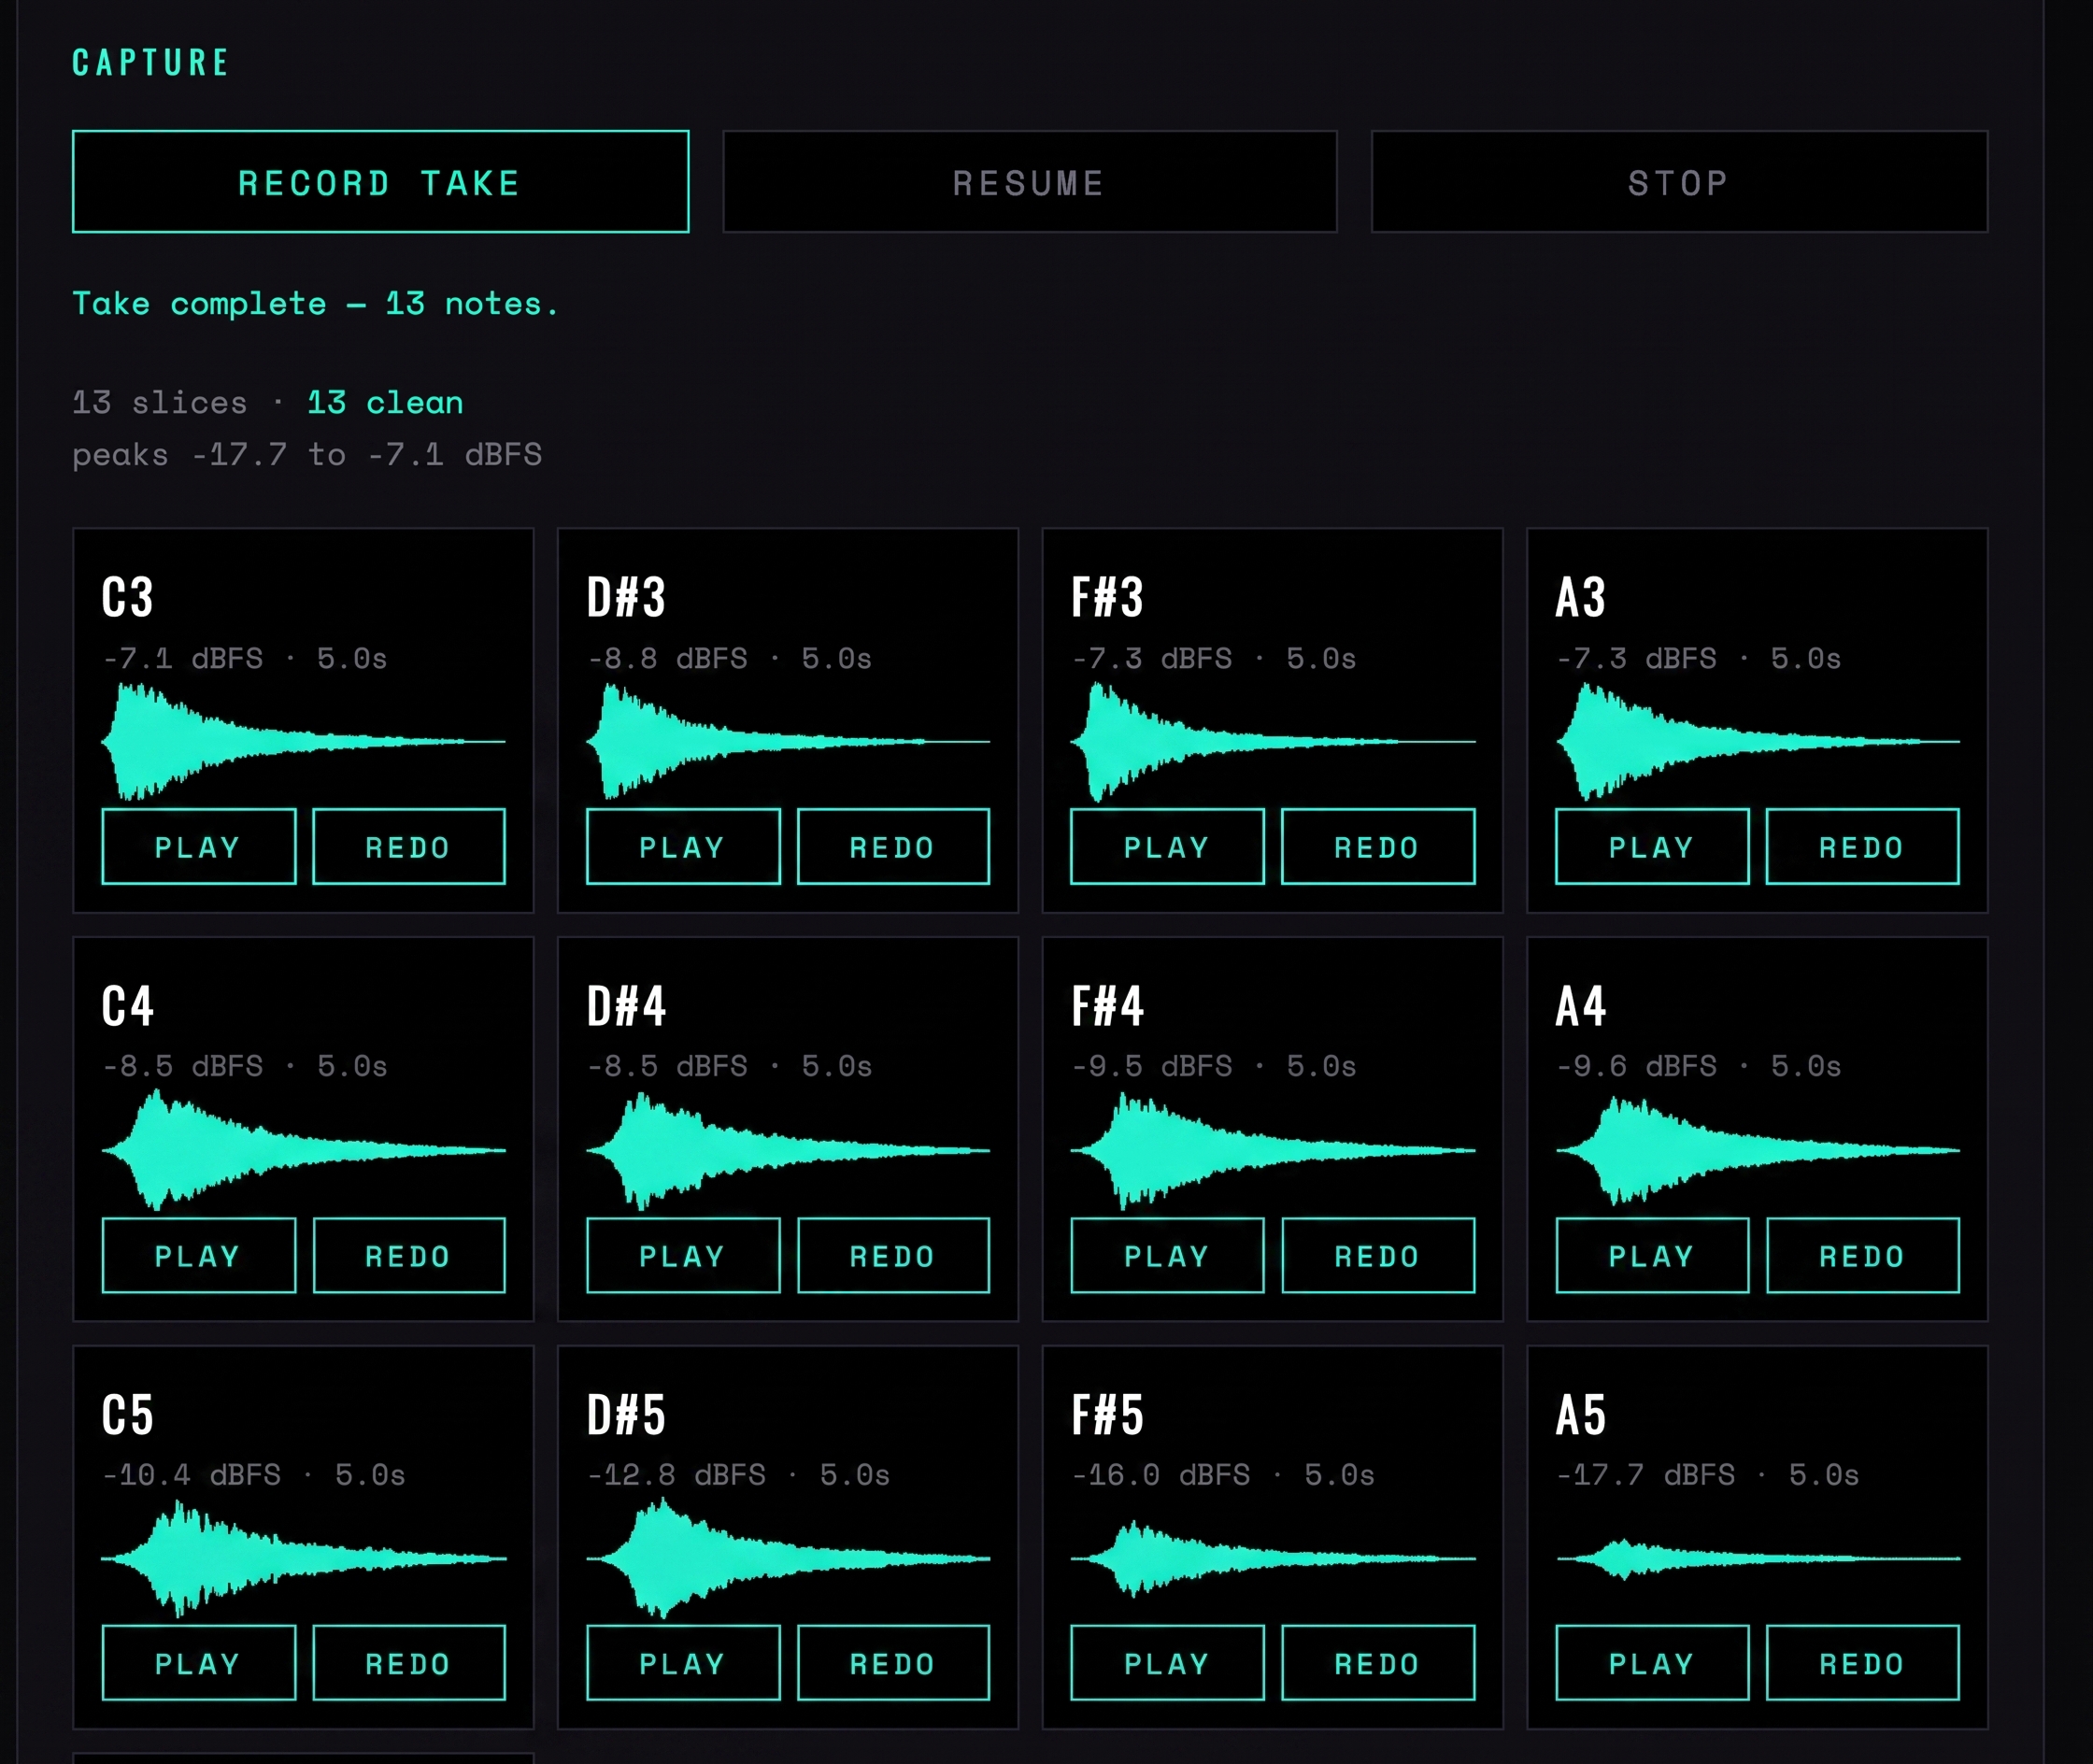
- Review the grid of slices. Each card shows a waveform, its peak, its length and any warnings; Play auditions it, Redo re-records that one note.
- Set the panel theme, background and edge behaviour, then press Export instrument — or Save WAVs only if you are mapping the samples elsewhere.
Before a long take
Run a short one first: three notes, wide interval, one velocity layer. It proves the routing, the latency figure and the input level in about a minute. Everything that can go wrong in a two-hour take goes wrong identically in a one-minute take.
Section two
Devices and latency
The first two panels do all the setup. Nothing below them will work until the input is open and the latency has been measured.
 1
2
3
4
5
1
2
3
4
5
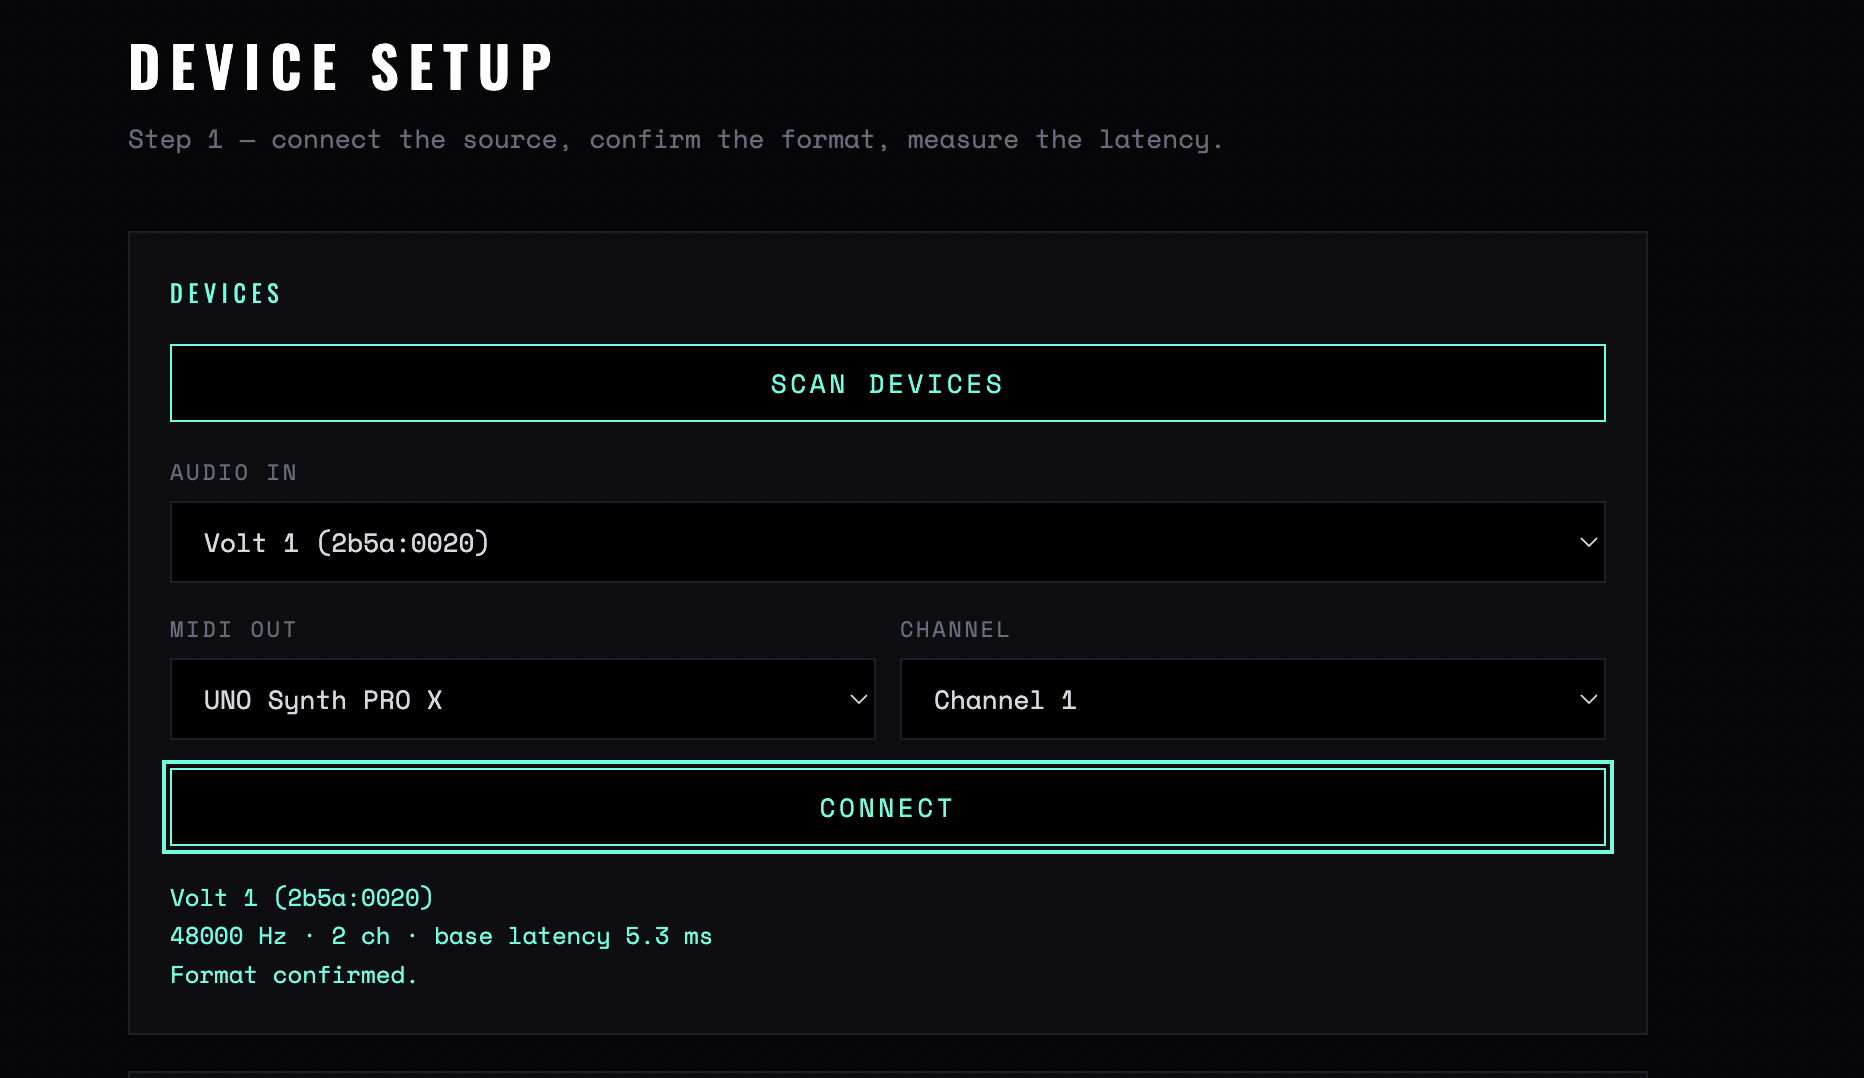
Figure 1 — Device Setup after a scan and a successful connect: a Volt 1 interface in, an UNO Synth PRO X on MIDI out, format confirmed at 48 kHz
1Scan devices — the only live control on load. Asks for both permissions and fills the three menus.
2Audio in — where the synth arrives, named as the operating system reports it.
3MIDI out and Channel — which port plays the synth, and on which of the sixteen channels.
4Connect — opens the input. Outlined in gold until pressed, because nothing below it works first.
5Format report — what the hardware actually delivered: 48000 Hz, 2 ch, 5.3 ms base latency.
Devices
Scan devices
Lists MIDI outputs and audio inputs. The two are requested independently, so a browser without MIDI still gives you the audio list — the MIDI line then carries the reason it failed rather than going blank.
Audio in
Your interface's input. Names come from the operating system, so an interface may appear more than once — once per input pair.
Automatic pairing
Most interfaces expose their MIDI port under the same name as their audio device, so Sample Harvester matches the two by name and says which port it chose. The guess stops permanently the moment you pick a port yourself — it will not overrule you later.
Channel
1 to 16, and it must match the synth. A synth on channel 1 receiving on channel 2 is the most common cause of a completely silent take.
Connect
Opens the input and reports what the hardware actually delivered. Sample Harvester asks for 48 kHz; if the device insists on something else you get a warning rather than a silent substitution, because the rate is written into every WAV.
Latency
A note sent over MIDI takes a measurable time to come back through the interface: converters, buffers and the synth's own response all add up. Sample Harvester measures that round trip and shifts every slice by it, so notes start where they should instead of a few milliseconds late.
 1
2
3
4
1
2
3
4
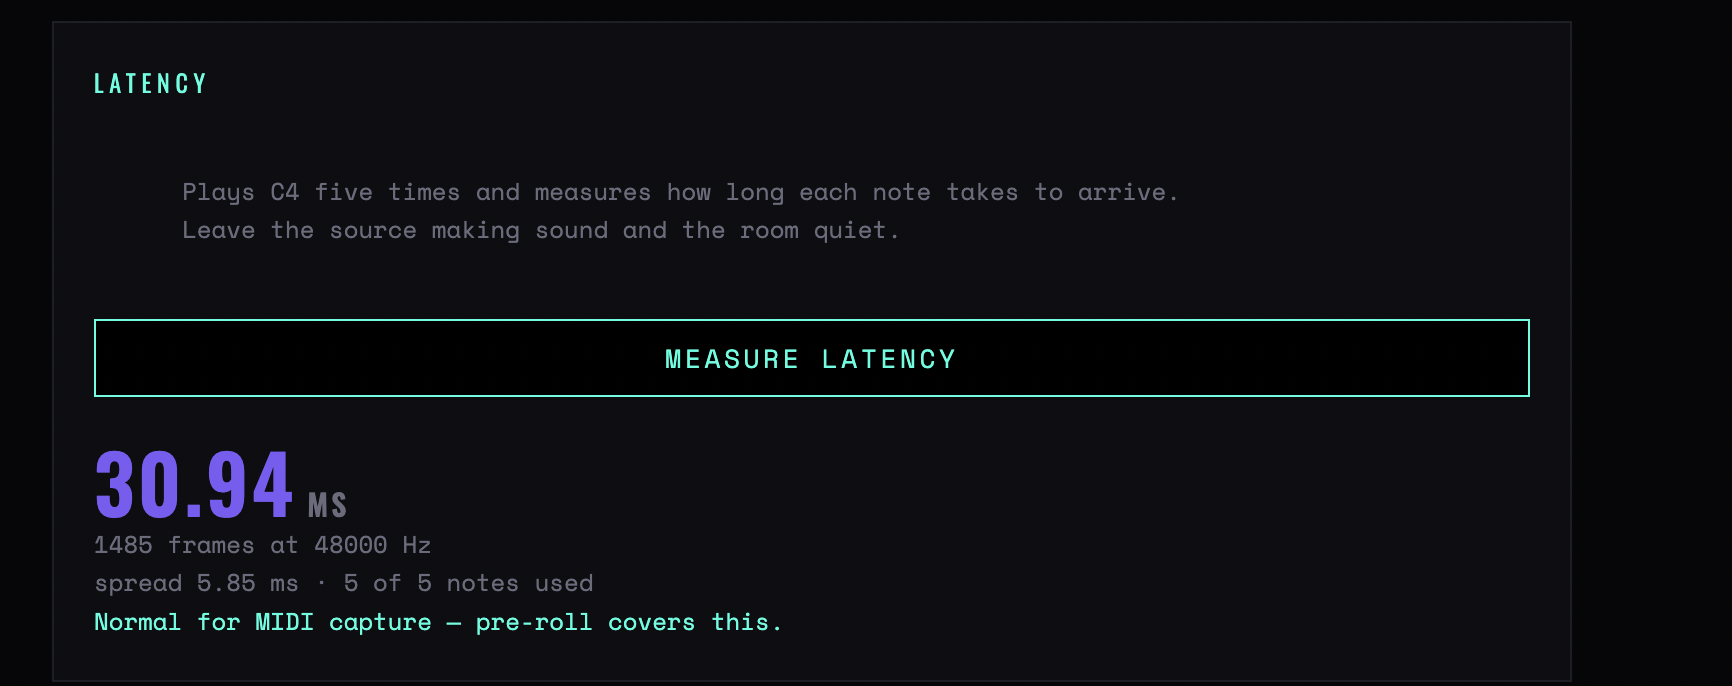
Figure 2 — A finished measurement. 1 the button, 2 the offset, 3 the spread and notes used, 4 the verdict
The test
Five notes at C4, timed individually. Outliers are discarded, which is why the result says how many of the five were used — five of five is a clean measurement, three of five means something interfered.
Offset
The headline figure, in milliseconds and in frames — here 30.94 ms, 1485 frames at 48000 Hz. Frames are what actually gets applied; the millisecond value is for you.
Spread
How much the five measurements disagreed, and the number that matters more than the offset. A large offset is corrected exactly; an inconsistent one cannot be, because there is no single right value to apply.
Verdict
Tight — nothing to do. Normal for MIDI capture — the pre-roll absorbs it. Loose — try a smaller buffer size on the interface, close other audio applications, and measure again. Loose results are worth chasing: they smear attack transients across the whole instrument.
Re-measure when
You change interface, buffer size, sample rate or synth. The figure is a property of the whole chain, not of Sample Harvester.
Section three
The sampling matrix
Seven fields decide how long you will be sitting there and how good the result will be. The estimate below them updates as you type, so the trade is visible before you commit to it.
 1
2
3
4
5
6
1
2
3
4
5
6
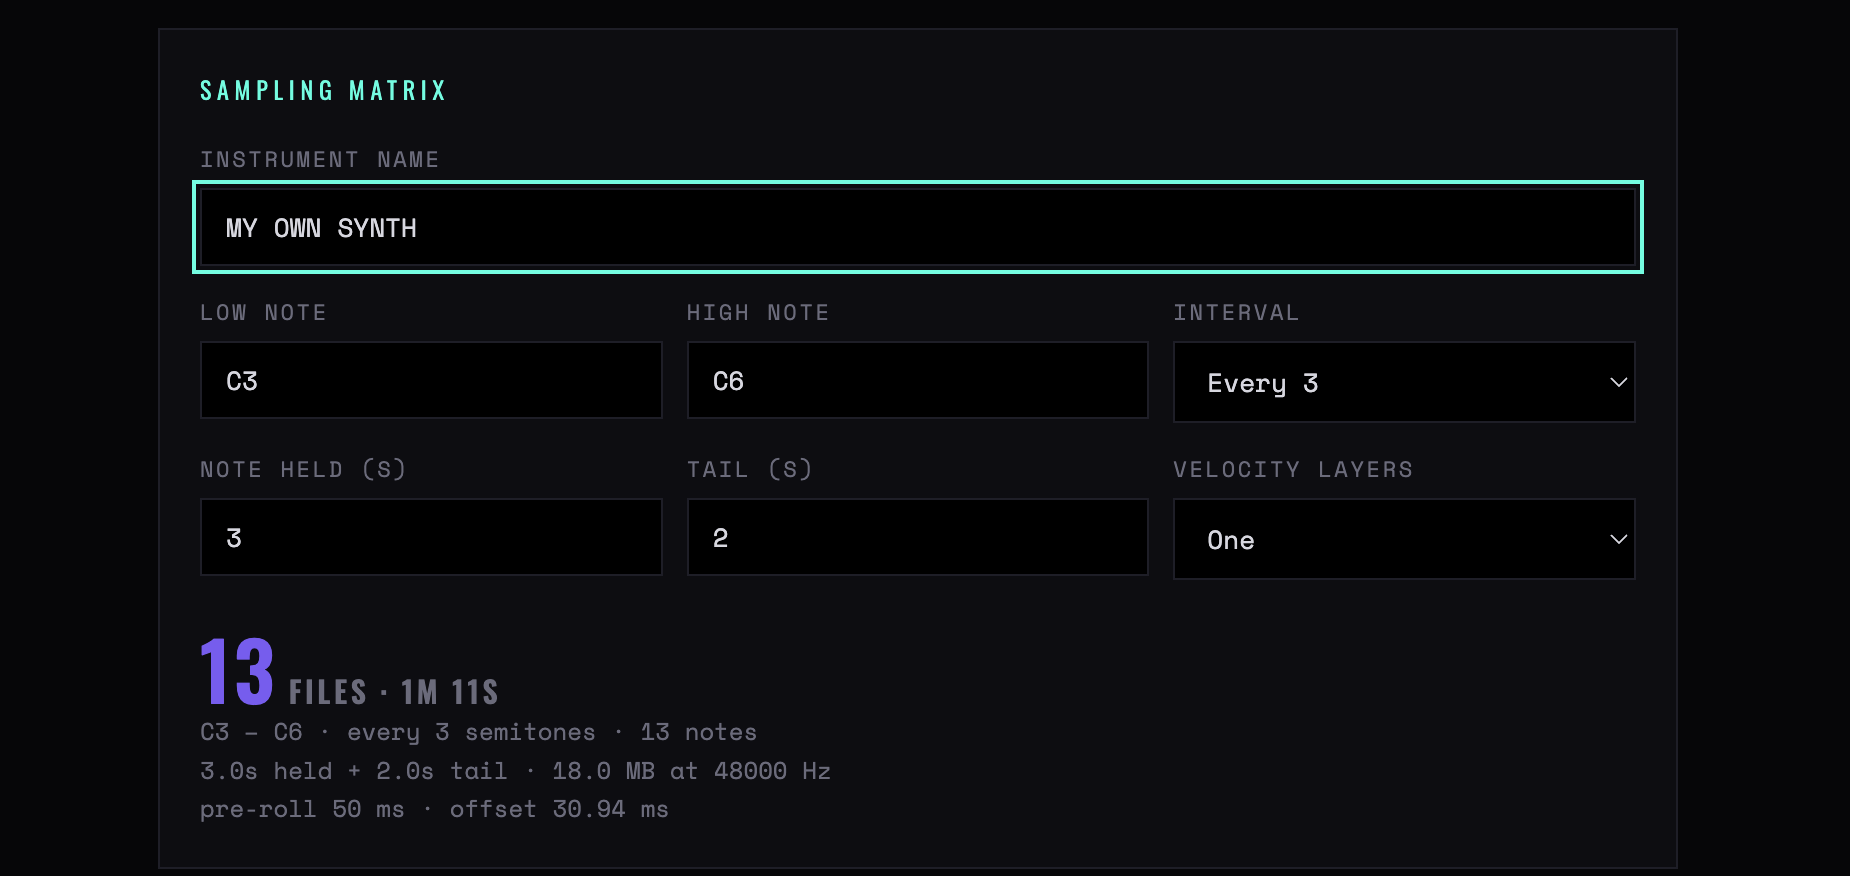
Figure 3 — The matrix filled in, and the estimate it produces: 13 files, 1 m 11 s, 18 MB, pre-roll 50 ms against the measured 30.94 ms offset
1Instrument name — becomes the preset name, the folder name and the sample prefix.
2Low and high note — typed as names: C3, F#4, Bb2.
3Interval — how far apart the sampled notes sit. The one field that multiplies everything else.
4Note held and tail — seconds of key-down, then seconds of release recorded after it.
5Velocity layers — one pass at velocity 100, or two at 64 and 110.
6The estimate — file count and duration in large figures, then range, size, pre-roll and offset.
The fields
Instrument name
Used for the preset, the folder and every sample file, so keep it short and free of punctuation.
Low / High note
Note names, not numbers. A mistyped name is caught immediately — the estimate is replaced by Note names must look like C3, F#4 or Bb2 rather than recording the wrong range. Sample the range the instrument actually sounds good over, not the full keyboard.
Interval
Every semitone is faithful and slow. Every third is the usual compromise — a minor third of stretch at the edges, which almost nothing audibly suffers from. Every fourth or sixth is fine for pads and drones, and audibly wrong on plucked and struck sounds, where pitch-shifting changes the attack.
Note held
How long the key is down, in seconds. It needs to cover the attack and enough sustain to loop or to play as-is — three seconds suits most pads, less for percussive material.
Tail
Seconds recorded after key-up, and where the release lives. Too short and every note is cut off at the same point, which is instantly recognisable as a badly sampled instrument. If the patch has a long release or heavy reverb, this needs to be longer than feels necessary.
Velocity layers
Two layers double the take and the file count, and are worth it only if the synth's patch actually responds to velocity — on a static pad they produce two nearly identical sets of samples. Check by playing the synth hard and soft before you choose.
The estimate
Files and duration
How many WAVs, and how long the take will run start to finish. The number to look at before pressing record.
Range and notes
The span, the interval and how many notes that works out to — a check that you typed what you meant.
Per note and size
Seconds per note and megabytes on disk, at the input's real sample rate. Full-range chromatic takes reach several gigabytes faster than most people expect.
Pre-roll and offset
A short lead-in recorded before each note, plus the measured latency. Together they guarantee the attack is inside the slice even if the synth responds late.
Warnings
Appended underneath. Advisories are worth reading; errors block recording until fixed, so a greyed Record take with text beneath it is telling you exactly what to change.
Section four
Recording and review
 1
2
3
4
1
2
3
4
Figure 4 — Mid-take. 1 Record take and Resume are locked out while Stop stays live, 2 the red lamp, 3 the note and count, 4 the progress bar
 1
2
3
4
5
1
2
3
4
5
Figure 5 — Review after a clean take. 1 take complete, 2 slices and peak range, 3 note and peak, 4 the waveform, 5 Play and Redo
Record take
Plays and records the whole plan unattended. The status block shows a red lamp, the note being played, the count, and a progress bar; when the notes are done it switches to Slicing and cuts the take into files.
Stop
Finishes the note in progress, then stops — you never get a half-recorded sample. Everything captured so far is sliced and kept, and the message tells you how many notes remain.
Resume
Continues from the next unrecorded note. This is what makes a long take practical: stop for a phone call, resume afterwards, or export the partial set and finish it later.
Take summary
Above the grid: how many slices, how many clean, how many carry notes, how many failed, and the range of peak levels — here −17.7 to −7.1 dBFS. A wide peak spread across the keyboard usually means the synth's own filter tracking, not a fault.
Slice cards
One per note: name, peak in dBFS, length, and a drawn waveform. A coloured edge marks a warning; a red edge marks a slice that failed its checks and will be left out of the export.
Reading a waveform
A shape check, not an editor. What you are looking for is an attack at the very start and a tail that fades rather than stops — and, read down a column, that the shape stays consistent as the notes rise. A flat line means silence, a block that fills the card means clipping, and a shape that ends abruptly means the tail is too short.
Play
Auditions that slice. Only one plays at a time, so clicking down a column is a quick way to hear the whole range for level and tuning jumps.
Redo
Re-records that one note in place, using the same plan. Fix a door slam or a dropout without touching the rest of the take.
Silent slices
Almost always MIDI: wrong channel, wrong port, or a synth in local-off. If every slice is silent, nothing is reaching the synth — check the channel first.
Hot slices
Turn the synth's output or the interface's gain down and re-record. Aiming for peaks around −6 dBFS leaves room for the loudest note in the range without clipping it.
Section five
Export
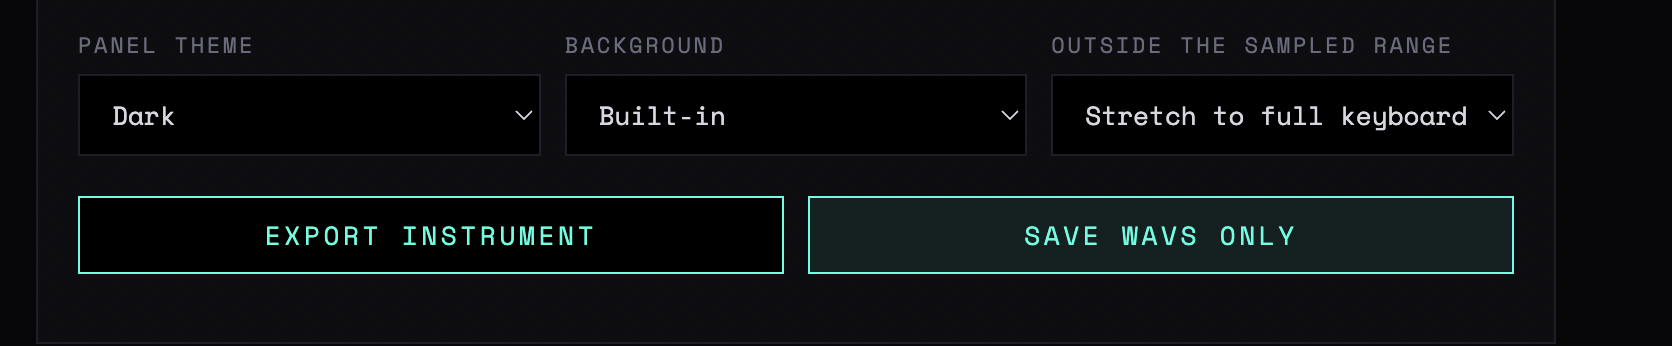
The last row appears once there is something to write. Three menus, then two buttons: a complete Decent Sampler instrument, or just the audio for another sampler.
 1
2
3
4
5
1
2
3
4
5
Figure 6 — The export row. 1 panel theme, 2 background, 3 edge behaviour, 4 export instrument, 5 save WAVs only
Export instrument
Writes the .dspreset and its samples. Key ranges are worked out from the interval so each sample covers the notes around it, and velocity layers are split automatically. Failed slices are left out and the count of them is reported.
Save WAVs only
The audio with no preset, named by note, for Kontakt, SFZ, Ableton Sampler, Logic's Sampler or anything else that maps a folder of files. This is the route for every sampler that is not Decent Sampler.
Panel theme
Dark or light, for the generated Decent Sampler panel. Ignored by a WAVs-only export.
Background
Built-in art, a flat colour, or your own image file — the file picker appears only when you choose Custom. The image is copied into the instrument folder, so it travels with the preset.
Outside the range
Stretch to full keyboard extends the lowest and highest samples across the remaining keys, so the instrument always answers. Silent leaves everything outside the sampled range dead — more honest, and the right choice when the transposition sounds bad.
Where it lands
Given folder access, Sample Harvester writes the whole instrument folder in one go. Without it, files download individually — and the message says so: put the WAVs in a Samples folder next to the preset, or Decent Sampler will not find them.
Section six
When something goes wrong
The MIDI list says unavailable
The browser has no Web MIDI. Use Chrome, Edge or Opera; Safari and Firefox cannot play the synth.
No inputs found
The microphone permission was refused, or the page is not on a secure origin. Allow it and scan again; serve the folder over https or localhost rather than opening the file directly.
Connect is still grey
No audio inputs were listed. Scan first; if the list stays empty, the interface is not reaching the browser at all.
Measure latency is grey
The input is open but no MIDI port is selected. Pick one, then connect again.
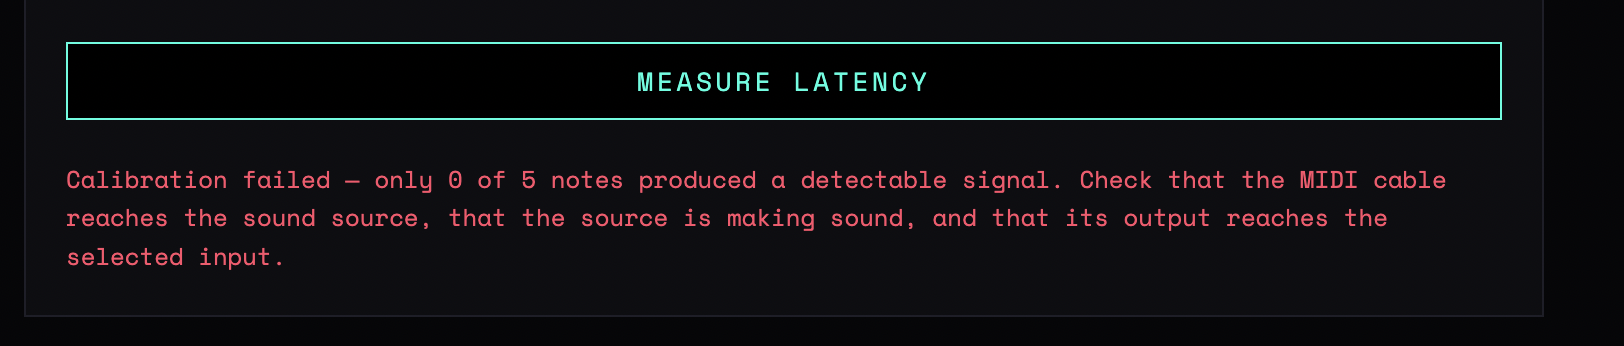
Calibration failed
Nothing came back. The message says how many of the five notes were heard — none at all means the MIDI or the audio path is broken, not that the timing is bad. Play the synth by hand while watching your interface's meters to prove the audio path first.
Figure 7 — A failed calibration names the count it heard and the three things to check, in order
The verdict says loose
Lower the buffer size on the interface, close other audio applications, and measure again. If it stays loose, expect slightly soft attacks — it is the chain, not the app.
Note names rejected
Use letter, optional sharp or flat, then octave: C3, F#4, Bb2. Nothing records until both fields parse.
Record take does nothing
The plan has a blocking error, printed where the take report would go. Fix that and press it again.
Every slice is silent
No MIDI is reaching the synth. Wrong channel, wrong port, or the synth is set to local off with no incoming route. Check the channel first — it is the usual answer.
Some slices are silent
Those notes fall outside the patch's key range, or the synth ran out of voices. Narrow the range, or use Redo on the few that failed.
Notes are cut off
The tail is shorter than the patch's release. Increase it and re-record — this cannot be repaired after the fact.
Room noise in the samples
Sample Harvester records whatever the input hears. Sample a direct output rather than a microphone where you can, and stay quiet during the take — especially during the latency test, which is listening for a single note.
Decent Sampler finds no samples
The files downloaded individually instead of as a folder. Put the WAVs in a Samples folder beside the .dspreset and reload it.
The take vanished
Nothing is stored between sessions. Reloading the page loses the audio — export before you close the tab.
A setting that works for most synths
C1 to C6, every third semitone, three seconds held and three of tail, one velocity layer, edges stretched. That is around twenty notes, two or three minutes of recording, and an instrument that plays convincingly across the whole keyboard. Add a second velocity layer only once you have heard the patch respond to velocity.
CB Sounddesign · Sample HarvesterAuto-sampler for Decent Sampler and others