CB Sounddesign
Eight DecentSampler tools
Operator's manual · v1.0
The DecentSampler Workbench
Eight browser tools that sit either side of the sampler: one plans the session, one records it, one checks the audio, one turns a folder of files into a mapped preset, and the rest inspect, compare, skin and lay out what comes back. Nothing is uploaded — every file you drop stays in the browser.
Before the session
Session Planner
Recording and after
Sample Harvester · Sample Check · Auto Mapper
On the preset
Map Check · Preset Diff · Skin Lab · UI Editor
The eight, in one line each
Session Planner
Takes, recording time, file count and disk space, worked out before you book the room.
Sample Harvester
The auto-sampler: plays the notes, records the takes and writes the mapped preset in one pass.
Sample Check
Batch audit of rate, depth, channels, peak, end fade and silence against targets you set.
Auto Mapper
Reads note, velocity and round robin out of file names and writes the mapped preset.
Map Check
Opens a finished preset and reports what it actually covers — gaps, overlaps, missing files.
Preset Diff
Two presets side by side, with a plain list of what was added, removed and changed.
Skin Lab
Generates knob and slider filmstrips as PNG, and inspects filmstrips you already have.
UI Editor
Lays out the preset's panel on a grid and exports the UI block as XML.
How to read this manual
Chapter one covers what all seven share — the drop target, the report pane, the export buttons. Chapters two to nine take one tool each, in the order you would meet them across a project. The final chapter is the round trip: planner to sampler to preset to panel, with the checks in between.
Chapter one
The shared shell
All seven open on the same dark frame: a title bar with the tool's own action buttons on the right, a working column on the left and a report or parameter column on the right. There is no login, no project file and no server. Everything you drop is read in the browser and forgotten when the tab closes.
Drop target
The dashed panel on the left. Dropping anywhere on the window works too — you do not have to hit the box. Folders are read recursively where the browser allows it, so a whole sample tree can go in at once. Clicking the box opens a normal file picker instead.
Paste XML
The preset tools accept pasted XML as well as a file, for when the preset is inside a zip or you are working from a snippet. Apply parses it exactly as if it had been dropped.
Summary
The row of counters under the drop target — files, groups, keys mapped, errors, warnings. Read it before the detail: it tells you whether the detail is worth reading.
Report
A full-width overlay with the findings as plain text, and Copy and Download beneath it. The text is written to be pasted into an email or a readme without editing — it is the deliverable, not a debug dump.
Nothing is uploaded
Stated on every drop panel, and true: the tools have no network calls once the page has loaded. The flip side is that nothing is stored either — close the tab and the work is gone unless you exported it.
Footer
The CB Sounddesign mark, info@cbsound.de, the legal links and the build version — v1.0.0 at the time of writing. Quote that version in any bug report.
Chapter two
Session Planner — before you record
You describe the instrument as a set of multipliers — how many sources, how many velocity layers, how many round robins, how many techniques — and the planner turns that into takes, hours, files and gigabytes. It is the tool that tells you a two-mic piano at four layers is a one-day session and a three-mic one is not.
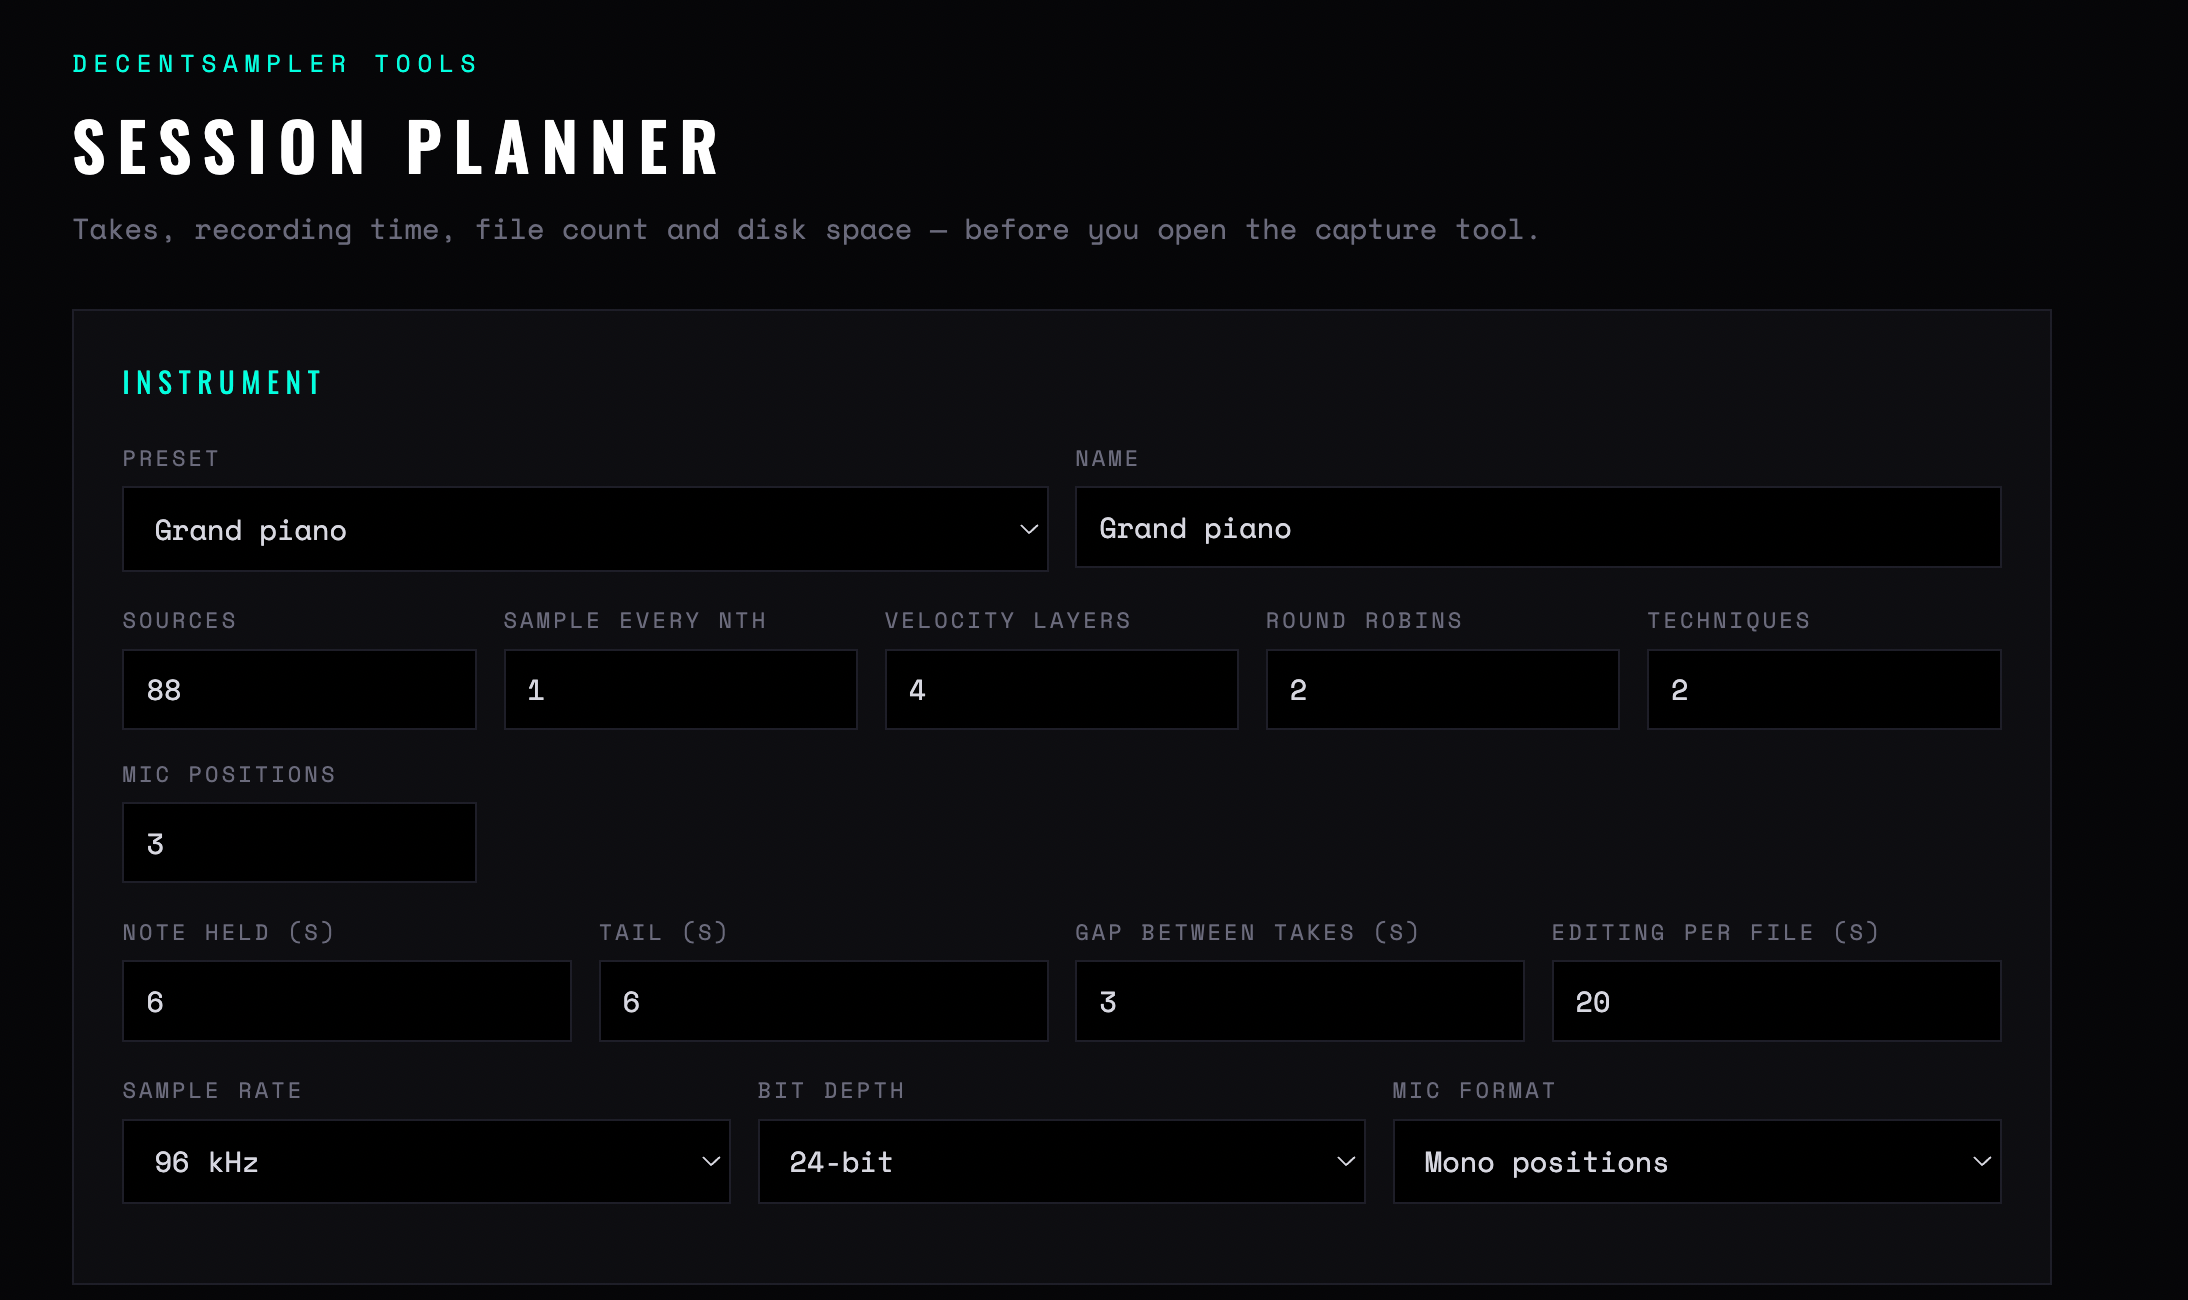
Figure 1 — The Instrument block, filled in for an 88-key grand at four velocity layers, two round robins and two techniques
Instrument
Preset / Name
A starting point — grand piano, drum kit, and so on — which fills every field below with sensible numbers. Name is what appears at the top of the exported brief.
Sources / every nth
How many playable sources the instrument has, and how densely you intend to sample them. 88 sources every 1 is every key; every 3 is a minor third apart and a third of the session.
Layers / RR / techniques
The three multipliers. They multiply, and that is the whole lesson of the tool: adding one technique to a four-layer, two-robin instrument does not add a quarter to the day, it adds a half.
Mic positions
Does not change the number of takes — you play the instrument once — but multiplies the file count and the disk space. This is the number that drives the editing estimate.
Note / tail / gap
Seconds per take: how long the note is held, how long you keep recording after it, and the pause before the next one. Tail is the one people underestimate — a six-second piano tail doubles a six-second note.
Editing per file
Seconds of editing you expect to spend on each produced file. Multiplied by the file count, not the take count — which is why the mic positions decide it.
Rate / depth / format
96 kHz 24-bit mono positions is the default. These feed the size figures only; they do not change the timings.
Takes, hours, files, gigabytes
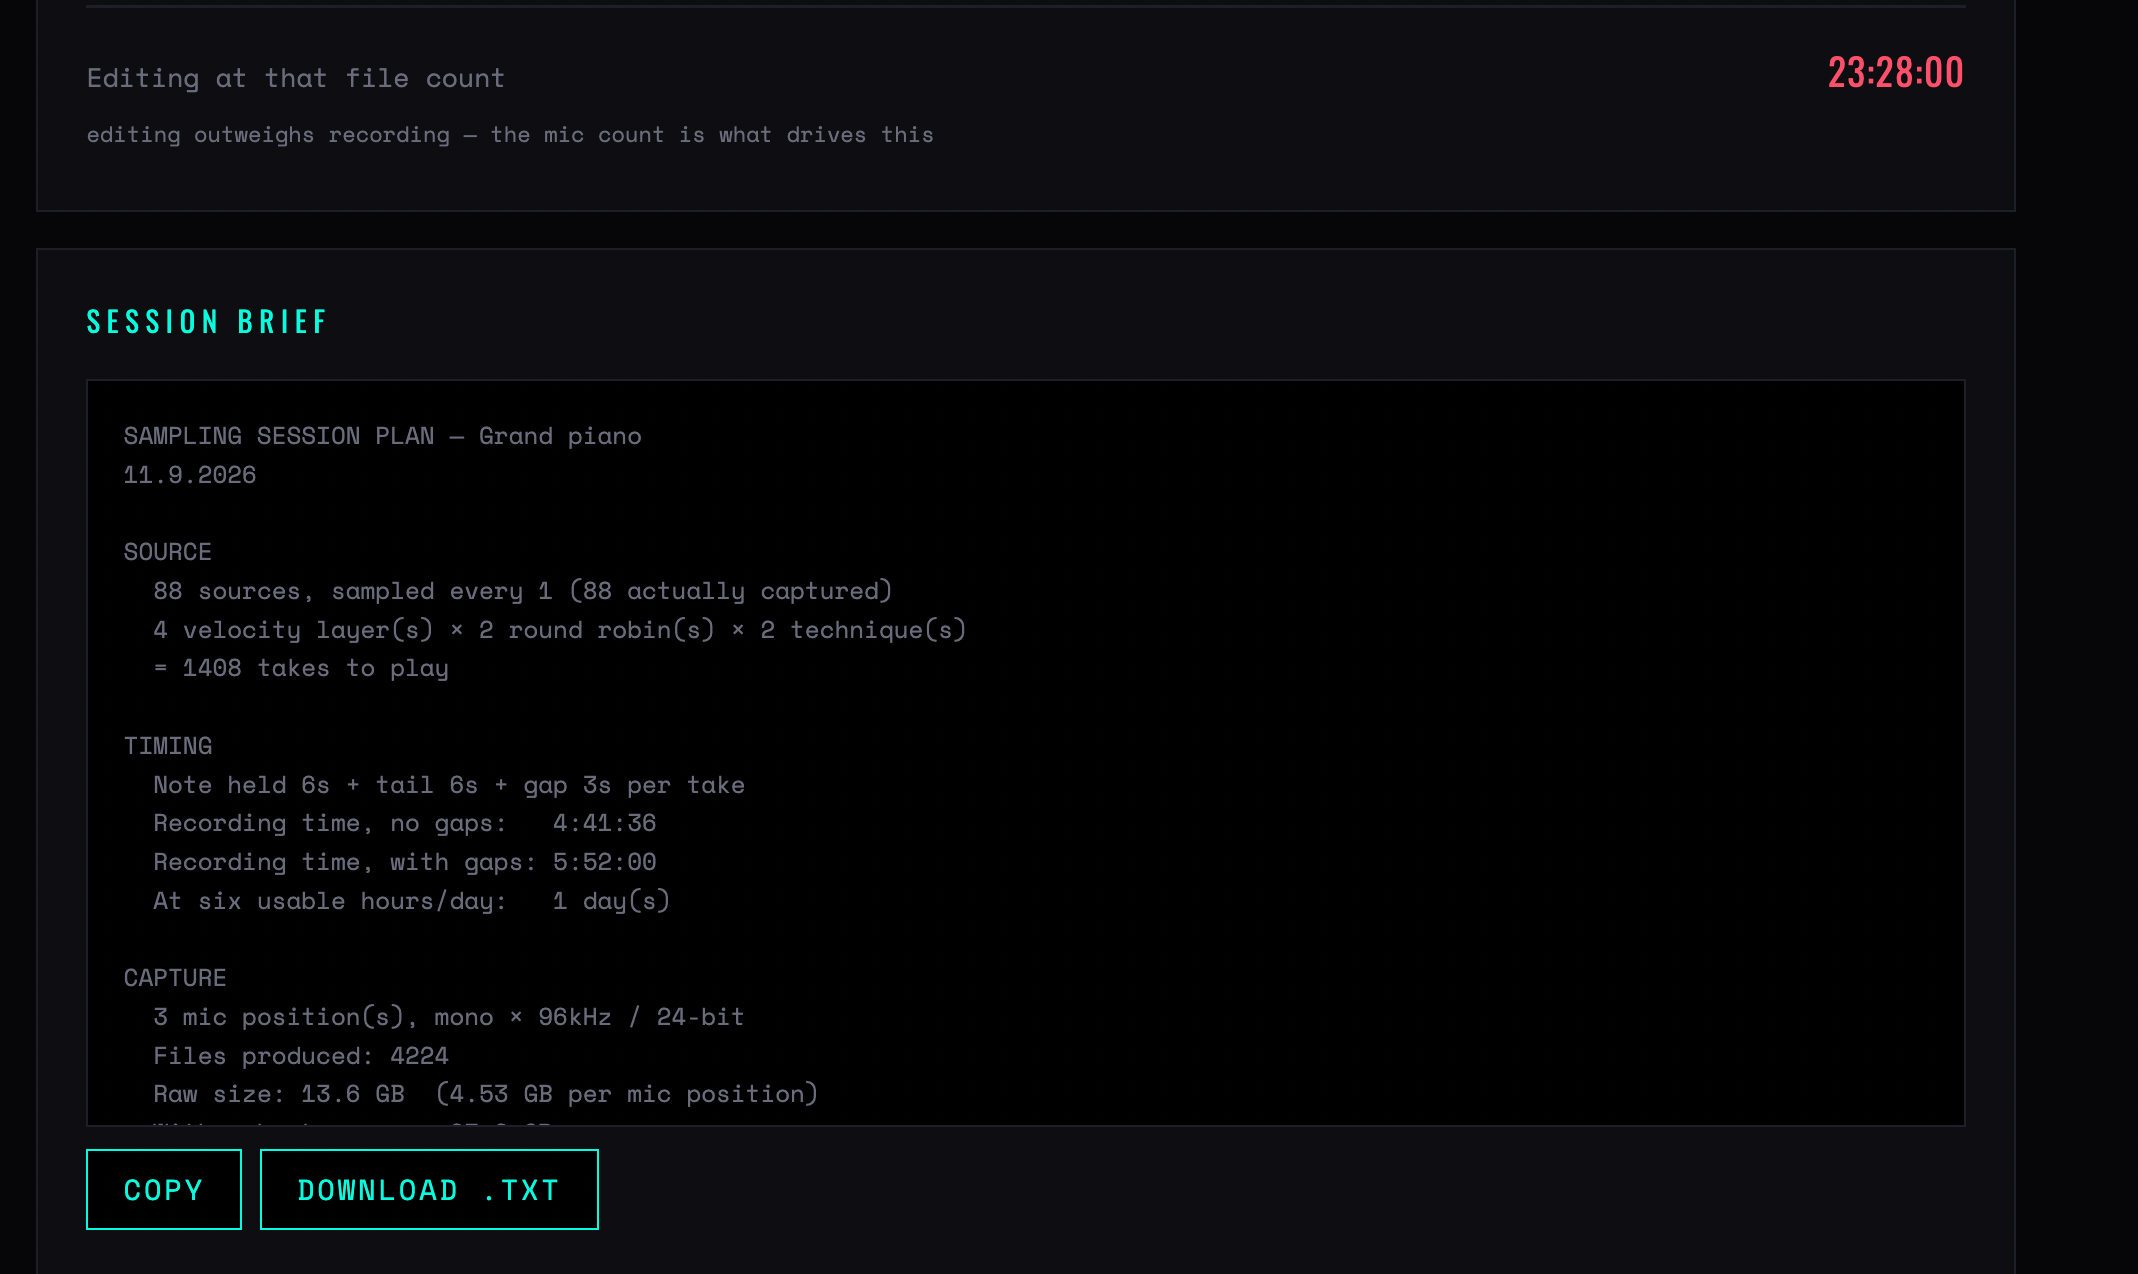
The same plan as a text brief
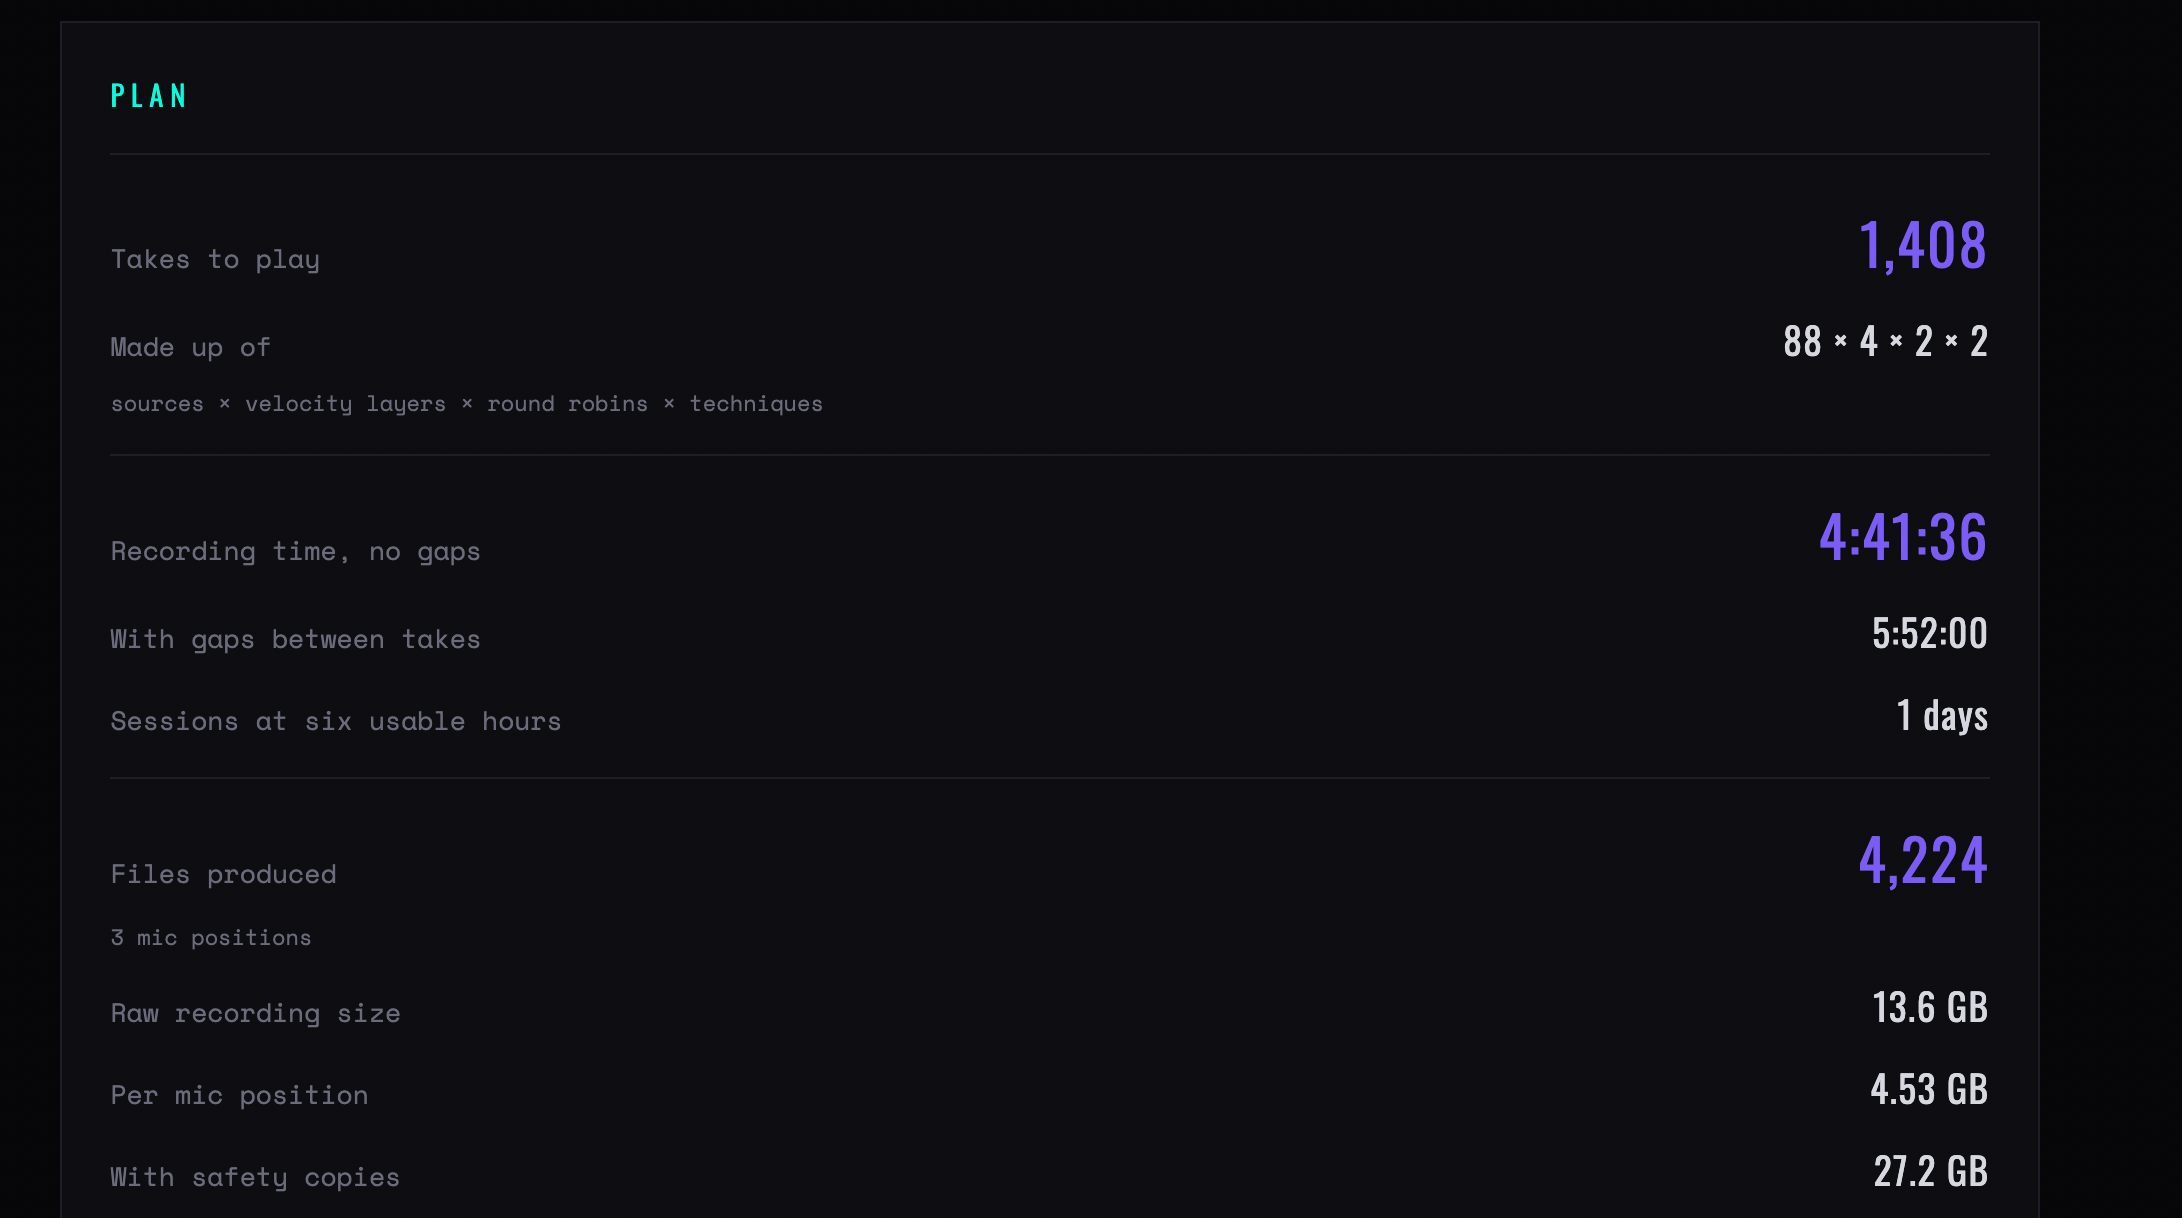
Figure 2 — The Plan block and the Session brief it writes: 1,408 takes, 4:41:36 of recording, 4,224 files, 13.6 GB
Plan
Takes to play
The headline number, with the multiplication printed under it so you can see which factor to cut. 88 × 4 × 2 × 2 is 1,408 — halve the round robins and you are at 704.
Recording time
Two figures: the notes alone, and the notes with the gaps between them. The second is the honest one. Underneath, the same figure divided into days at six usable hours — six, not eight, because nobody plays 1,400 careful takes for eight hours.
Files produced
Takes × mic positions. The raw size follows, then the per-position size, then the size with safety copies — the number your drive actually has to hold.
Editing at that file count
The editing estimate in hours, with the note that editing outweighs recording. On a three-mic instrument it usually does, by a factor of four or five.
Presets and the brief
Your presets
Save the current form under a name and load it back later. Saved in this browser only — they do not sync, and clearing site data removes them. Export the brief for anything you want to keep.
Session brief
The whole plan as plain text under four headings — source, timing, capture, and the totals. Copy for an email, Download .txt for the session folder. Put it next to the recordings: in six months it is the only record of why the files are laid out the way they are.
Chapter three
Sample Harvester — record the takes
The auto-sampler. It plays your synth over MIDI, records the audio coming back, cuts the result into one WAV per note and writes a mapped preset around them. Everything the other tools do by hand to a folder of files, Harvester does at the moment the files are made — which is why the map it produces needs less fixing than one derived from names.
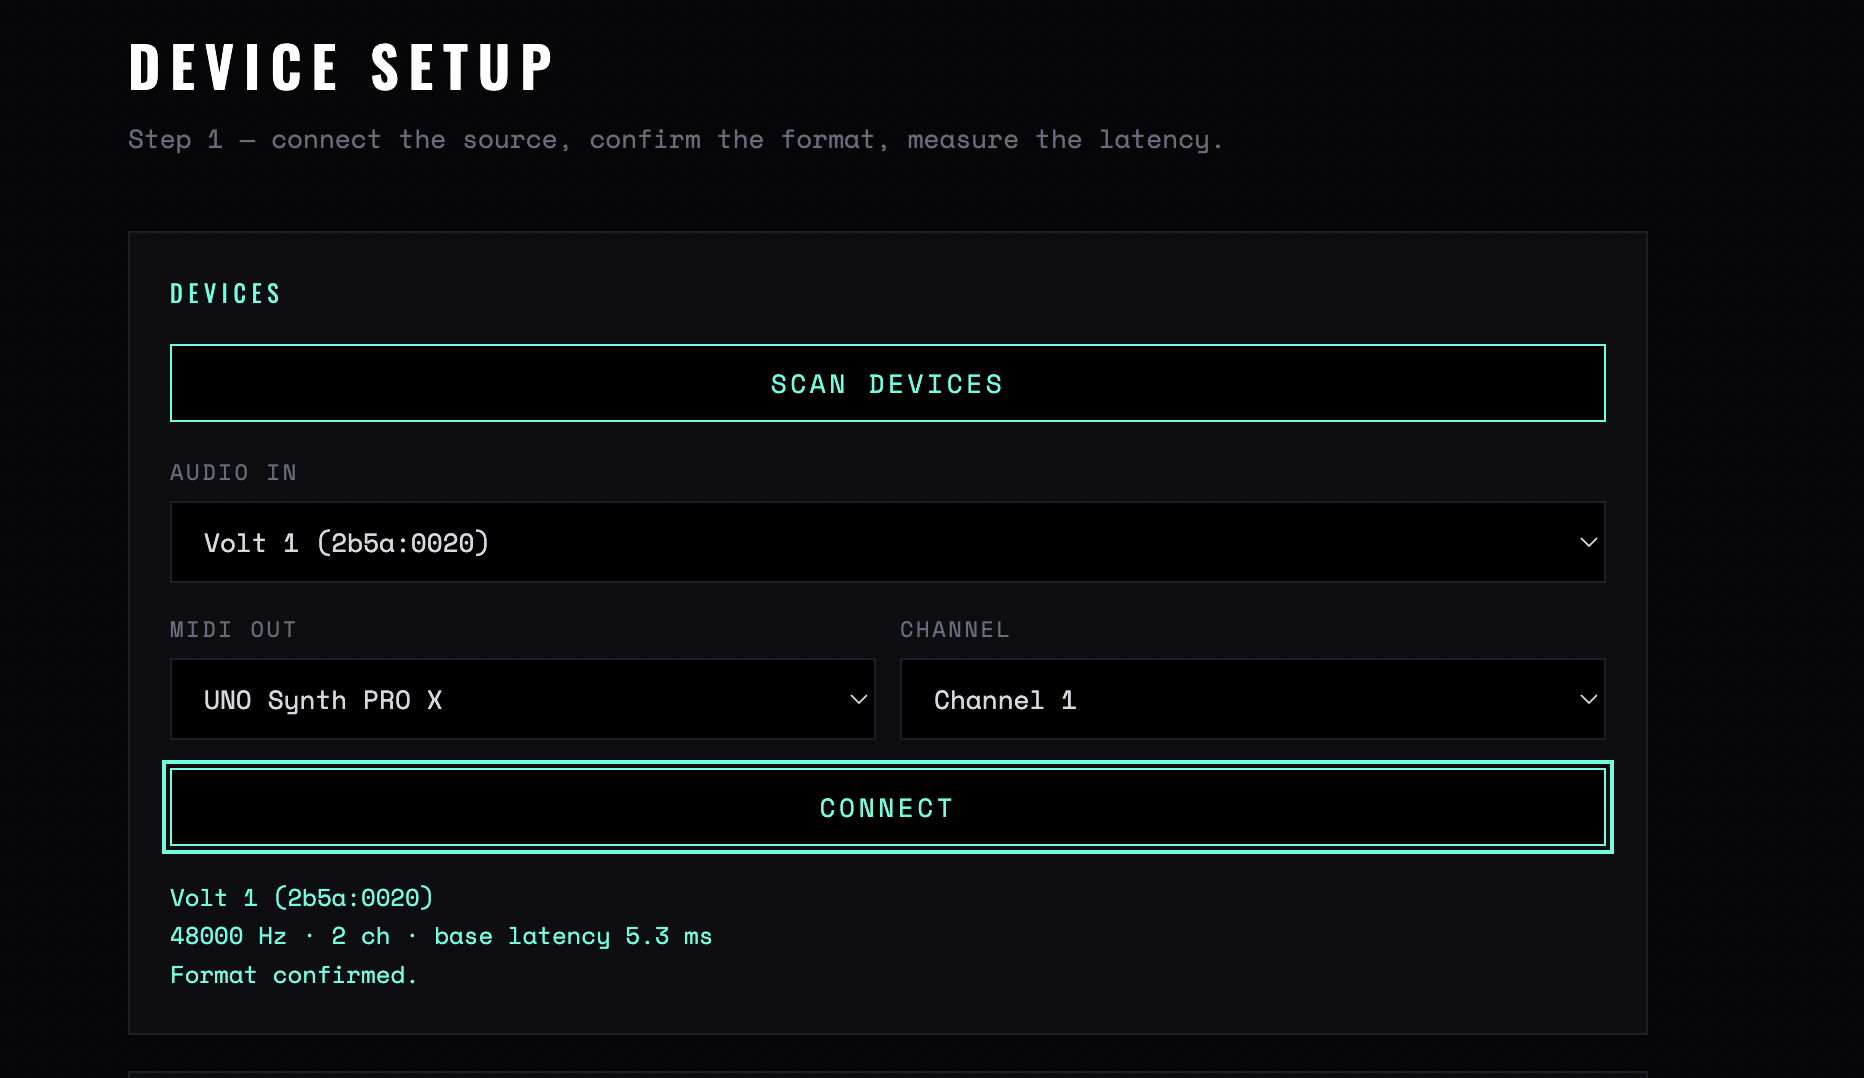
Figure 3 — Device setup: the MIDI output, the audio input and the channel, with the automatic pairing reported beneath
Devices and latency
Scan devices
Lists MIDI outputs and audio inputs. The two are requested independently, so a browser without MIDI still gives you the audio list — the MIDI line then carries the reason it failed rather than going blank.
Automatic pairing
Most interfaces expose their MIDI port under the same name as their audio device, so Harvester matches the two and says which port it chose. The guess stops permanently the moment you pick a port yourself.
Channel
1 to 16, and it must match the synth. A synth on channel 1 receiving on channel 2 is the commonest cause of a completely silent take.
Measure latency
Five notes at C4, timed individually, outliers discarded — five of five is a clean measurement. The offset is applied in frames; the spread matters more than the offset itself, because an inconsistent delay cannot be corrected exactly.
Re-measure when
You change interface, buffer size, sample rate or synth. The figure is a property of the whole chain, not of the tool.
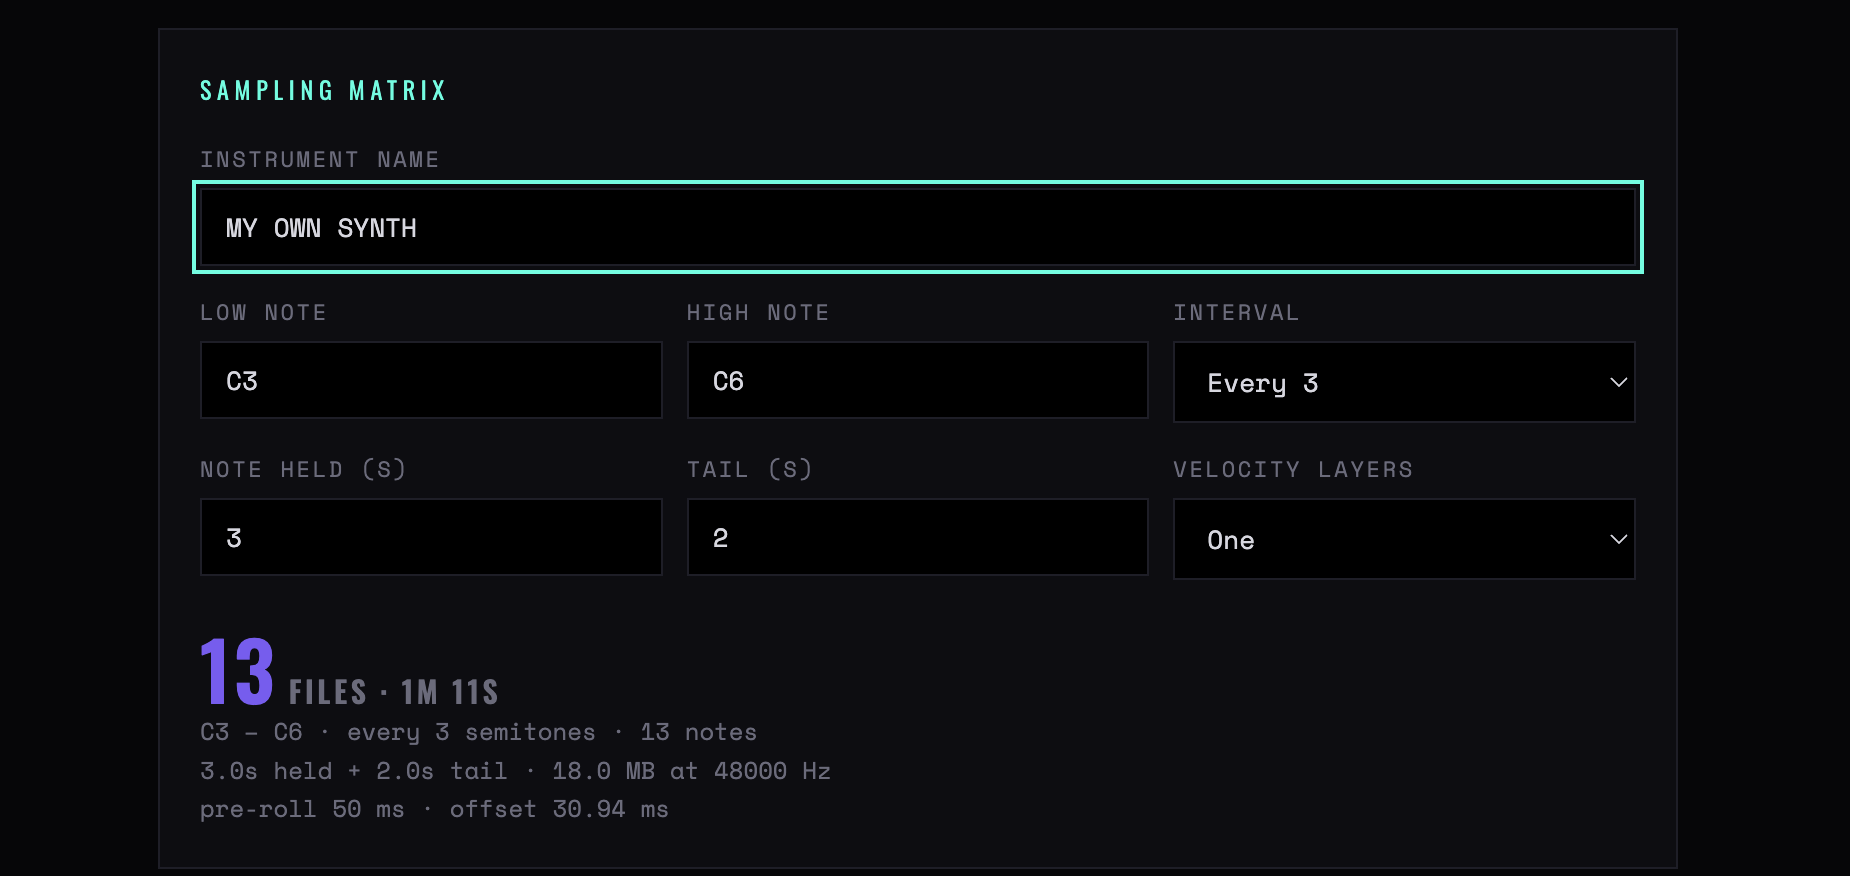
Figure 4 — The sampling matrix, with the estimate underneath: files, duration, per-note time and size on disk
The sampling matrix
Instrument name
Used for the preset, the folder and every sample file — short, and free of punctuation.
Low / high note
Note names, not numbers, and validated as you type. Sample the range the instrument actually sounds good over, not the full keyboard.
Interval
Every semitone is faithful and slow. Every third is the usual compromise. Every fourth or sixth is fine for pads and audibly wrong on plucked and struck sounds, where pitch-shifting changes the attack.
Note held / tail
Seconds with the key down, then seconds recorded after key-up. The tail is where the release lives; too short and every note is cut at the same point, which is instantly recognisable as a badly sampled instrument.
Velocity layers
Two layers double the take and the file count, and are worth it only if the patch actually responds to velocity. Play the synth hard and soft before deciding.
The estimate
Files, total duration, seconds per note and megabytes on disk at the input's real rate — the block to read before pressing record. It is the same arithmetic Session Planner does for a live session, applied to a synth.
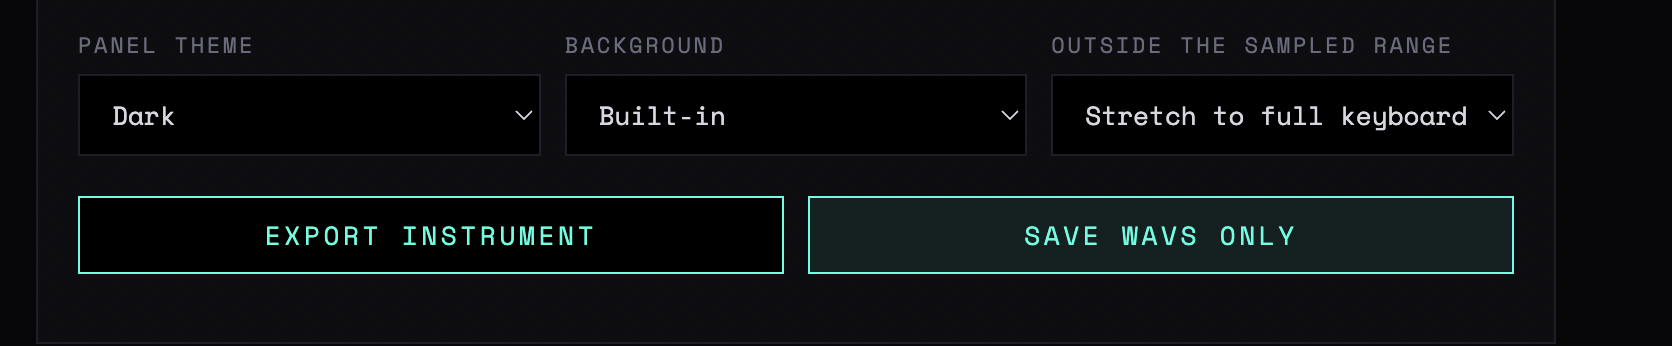
Export: preset, samples, folder
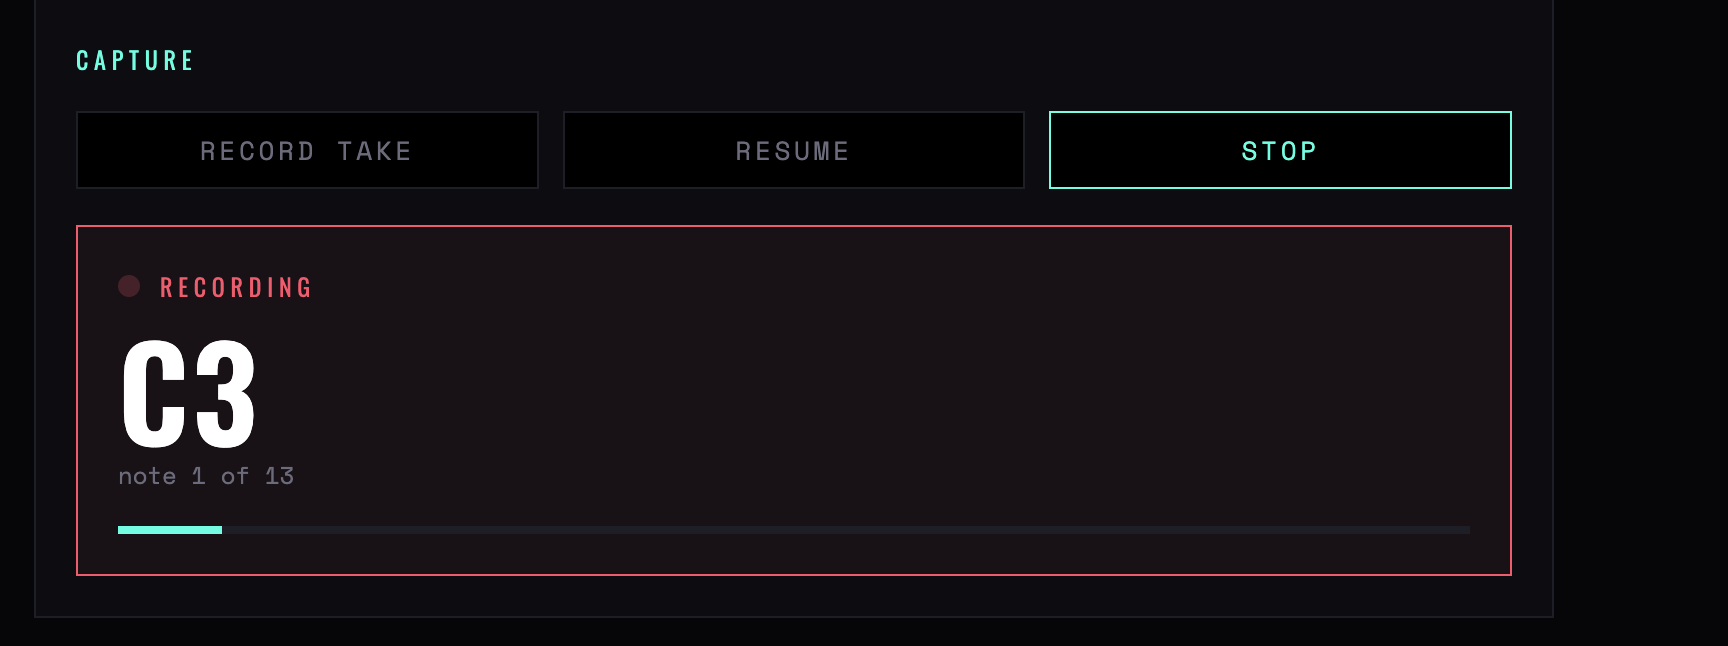
Figure 5 — Recording in progress, and the export block that writes the finished instrument
Recording, review and export
During the take
Note, layer, elapsed and remaining, with the input level beside them. Watch the level on the first few notes — the loudest note of the instrument is the one that clips, and it is rarely the first.
Review
Every capture as a waveform in a grid. Read down a column rather than at individual notes: consistency is what you are checking, and a take that is wrong is obviously wrong next to its neighbours.
Export
The WAVs plus a .dspreset with the mapping already written, in one folder ready to open. Because the roots are known rather than parsed, Auto Mapper is not needed on this material — go straight to Map Check.
Harvester or the long way round
Use Harvester whenever the source can be driven over MIDI — a synth, a sampler, a plug-in, an outboard box. Use the Planner-to-Mapper route when the source is played by hand: an acoustic instrument, a room, a found object. Sample Check is worth running either way; Harvester's files are consistent by construction, but the synth's own output is not always.
Chapter four
Sample Check — audit the audio
Drop the folder that came off the session and set what the files are supposed to be. Every file is decoded and measured, and anything that misses a target is flagged. Run it before the mapper, not after: a preset built on a stray 44.1 kHz file is a preset you will rebuild.
Targets
Sample rate
From 8 kHz to 192 kHz, or any if you only care about the other checks. The point is consistency, not a particular number — a folder that is entirely 48 kHz passes; a folder that is mostly 96 kHz does not.
Bit depth / channels
16, 24 or 32 bit; mono or stereo. A mono target catches the interleaved stereo file that slipped out of the wrong bus.
Max peak
The ceiling in dBFS. Anything above it is an error, not a warning — a clipped sample cannot be rescued downstream.
Fade at end
Checks that the file actually reaches silence rather than stopping mid-tail. This is the check that finds truncated takes, and it finds a lot of them.
Check silence
Flags files that are silent or near-silent throughout — the take where the mic was muted, which is otherwise invisible in a folder of 4,000 files.
Re-evaluate
Applies changed targets to the files already loaded, without re-reading them. Decoding several thousand files takes a while; changing your mind about the target should not.
Reading the result
All / Issues only
The filter above the list. Work in Issues only; switch to All when you want to confirm the good files are genuinely uniform.
Summary counters
Files, errors, warnings, total length, and — the useful pair — how many distinct rates and depths were found. Anything other than one of each means the folder is mixed.
Cannot decode
Its own category. Usually a codec the browser will not open rather than a corrupt file — convert it and check again before assuming the worst.
Report / As CSV
The text report for people, the CSV for a spreadsheet or a script. The CSV carries one row per file with every measured value, so it is also a decent inventory of the session.
Chapter five
Auto Mapper — folder to preset
The mapper reads your file names. If the names carry the note, the velocity layer and the round robin — and they almost always do, because the recorder wrote them — then a mapped preset is a drag away. Everything below is about telling it how your names are spelled.
Piano_C3_v3_rr2.wav
PianoC3v3rr2
Rootnote name or MIDI number — Middle C decides whether C3 is 48 or 60
Velocitylayer index — layers are ordered and the ranges split evenly
Round robincycle index — sequence, random, true random, or always layered
Restignored, or used to group — name, folder, one group, or left out
Figure 6 — What the mapper takes from a file name, and which control governs each part
Reading the names
Middle C
Which octave number means MIDI 60. Get this wrong and the whole map sits an octave out — it is the first thing to check when a preset plays low.
Velocity
Detect from name reads the layer index and splits 1–127 evenly between the layers it finds. Ignore treats every file as a single full-range layer — right for one-shot material.
Round robin
Off, or one of four behaviours: sequence cycles in order, round robin is DecentSampler's own cycling, random avoids immediate repeats, true random does not, and always layers every robin on top of each other — which is not a robin at all but is occasionally what you want.
Groups
Group by name, by folder, everything in one group, or leave the unmatched out. Folder grouping is the reliable one when the session was recorded per technique.
Unmatched
What happens to files whose names gave up nothing. They appear in the table as no note found; decide whether they join a group or stay out of the preset entirely.
Building zones
Spread
How the gap between two sampled notes is divided. Root upwards stretches each sample up to the next root, root downwards stretches down, split the gap meets in the middle. Split is the neutral choice; upwards keeps the attack of the lower sample, which usually sounds better on plucked and struck instruments.
Max stretch
The furthest a sample may be transposed, in semitones. Beyond it the zone simply ends rather than stretching into a chipmunk. Raise it to close gaps, lower it to be honest about a sparse map.
Fill edges
Extends the lowest and highest zones to the ends of the keyboard. Convenient, and worth turning off once so you can see how far the real material actually reaches.
Path prefix
Prepended to every sample path in the XML — typically Samples/. It has to match where the files sit relative to the .dspreset, or the preset loads with nothing in it.
Export
Groups block only
Just the mapping, for pasting into a preset you have already built. Use this when the UI and effects are done and only the samples changed.
Full preset
The mapping plus a working ADSR panel, so the result opens and plays immediately. The panel is a starting point, not a design — hand it to the UI Editor when you are ready.
Download folder
Writes the .dspreset alongside a Samples folder containing the files you dropped, so the result is a complete instrument rather than an XML that points at your desktop.
Summary table
One row per file — instrument, root, velocity, robin, group, path — with the counters above it. Read the unmapped and no note found counts before you export anything.
Chapter six
Map Check — what the preset really covers
Drop a finished .dspreset and it is parsed, drawn and checked. Where Auto Mapper says what it intends to build, Map Check says what is actually there — including in presets you did not build.
Summary
Samples, keys mapped, errors, warnings, round robin and effects at a glance. Keys mapped against the keyboard range is the number that matters: 61 of 88 means 27 silent keys.
Zone map
The mapping drawn out, group by group. Click a zone for its detail — root, note range, velocity range, robin index, loop points and the sample path. Unmapped keys are marked as such rather than left blank.
Checks
The findings, split into errors and warnings and grouped by category. A category with nothing in it says so rather than disappearing, which is how you know it was checked.
Missing
Samples referenced by the XML that are not on disk beside it. The commonest single fault in a shipped preset, and invisible until someone else opens it.
UI table
Every control in the preset's UI block — tab, type, label, position, target — with no target — does nothing spelled out for the ones that are wired to nothing. If the preset has no UI block at all, it says that too.
Chapter seven
Preset Diff — what changed
Two presets, A before and B after, and a list of what moved between them. For the version you shipped against the version on your disk, or for working out what a collaborator actually touched.
A and B
Two slots, labelled before and after. Dropping onto the window fills the next empty slot, so you can drag both in one after the other without aiming. Swap A / B reverses the reading if you loaded them the wrong way round.
Changes only / Everything
The filter. Changes only is the working view; Everything prints the unchanged entries too, which matters when you are proving that something did not change.
Added / removed / changed
The three states, colour-coded, across samples, groups, effects and the UI panel. The two presets are identical is a valid and useful answer.
Invalid XML
If either file will not parse, the tool says which one and stops rather than reporting a false difference. Run that file through Map Check to find out why.
Chapter eight
Skin Lab — filmstrips
A DecentSampler knob is a single tall PNG with one frame per position. Skin Lab draws those strips, and reads strips you already have to work out how they were drawn.
Build
Shape
Five styles: arc, ring with pointer, pointer on disc, vertical bar and tick marks. The first three are knobs, the fourth is a slider, the fifth is for stepped controls where the position should read as a count rather than an angle.
Frame size / frames
The square size of one frame and how many frames the strip has. More frames is smoother and heavier; 31, 65 and 128 are the common counts. The exported strip is frame size × frames tall.
Sweep / thickness / padding
The geometry: how many degrees the control travels, how heavy the arc is, how much air sits around it. A 270° sweep is the convention; go wider and the pointer at the extremes starts to read as upside down.
Colours
Fill, track, disc, pointer, disc opacity and glow. Everything is drawn on transparency, so the strip sits on whatever backdrop the panel has.
Orientation
Vertical or horizontal strip. DecentSampler expects vertical; horizontal is there for other hosts.
XML for the preset
The matching control block, ready to paste, with the frame count already filled in. Put the PNG next to the .dspreset or fix the path in customSkinImage.
Inspect
Drop a filmstrip
Give it a PNG and it measures the image and works out how many frames it can plausibly hold. Suggest frame count lists the divisors that produce square frames — usually only one of them is right, and it is usually obvious which.
Frame preview
Steps through the frames so you can confirm the count before trusting it. If the pointer jumps rather than sweeps, the count is wrong.
Chapter nine
UI Editor — the panel
A layout surface for the preset's front panel. Drop an existing preset to edit its UI, or start from a skeleton; place controls on a grid, wire each to a parameter, and export the UI block. It is the only tool here that writes the part of the preset the player actually looks at.
The panel
Width / height
The panel size in DecentSampler's own units. Set it first — changing it later moves everything relative to the edges.
Backdrop
A dropped PNG or JPG, or an image URL. Remove image puts you back on the design preset's flat colour.
Safe area
Guides for the top and bottom margins the player's own chrome occupies. Keep controls inside them and the panel survives being resized.
Grid / snap
Grid size and snapping. Snap on is how a panel ends up looking designed rather than assembled; turn it off only for the one element that genuinely needs to sit off the grid.
Design preset
A colour scheme applied to control, track and text at once, with Apply to all elements to push it across a panel you have already built.
Elements
Type and label
What the element is and what it says. The label is what the player reads; the target is what it does, and the two are independent — which is a hazard as much as a freedom.
Skin
A dropped filmstrip, or none — design preset to use the flat style. Match skin proportions resizes the element to the strip's own aspect so the artwork is not squashed.
Parameter
Target, name, level, min, max and start value. Level is which part of the instrument the binding addresses; the range is what the control sends across its travel.
Duplicate / delete
Duplicating carries the skin, the colours and the binding, so a row of four identical knobs is one knob and three copies with the target changed.
Export
UI block only
Just the panel, to paste over the UI block of the preset you are working on.
Update loaded preset
Writes the panel back into the preset you dropped, leaving its groups and effects untouched. This is the one to use in a real project.
New preset (skeleton)
The panel wrapped in the minimum preset that will open. For designing a panel before the samples exist.
Chapter ten
The round trip
The tools are separate on purpose — each does one job and hands over a file — but they were designed as one pass. This is that pass, in order.
- Plan it. Session Planner, until the day count and the disk figure are both acceptable. Download the brief into the session folder.
- Record it. Sample Harvester if the source takes MIDI — it writes the mapped preset itself, so steps four and six collapse into one. Playing by hand instead? Name the files so the note, layer and robin are in the name; that decision is what makes the mapping automatic.
- Check it. Sample Check against the targets from the brief. Fix the errors before going further; note the warnings.
- Map it. Auto Mapper. Set Middle C, confirm the counters, export the full preset with its folder.
- Verify it. Map Check on what you just built. Keys mapped against the intended range; no missing samples.
- Skin it. Skin Lab for the knobs the panel needs, at one frame size for the whole set.
- Lay it out. UI Editor, dropping the preset from step four and updating it in place.
- Ship it — then diff it. Keep the shipped copy. When the next version comes back from a collaborator, Preset Diff tells you what actually moved.
The one rule
Every tool here reads files and writes files; none of them remembers anything. Export at each step, into a folder named after the instrument, and the round trip is repeatable a year later. Work in tabs you never close, and it is not.
CB Sounddesign · DecentSampler ToolsOperator's manual · v1.0